ERP Development and Adobe Experience Integration

Introduction
ERP development plays a crucial role in streamlining business operations, and integrating it with Adobe Experience Manager (AEM) enhances digital experience personalization. Adobe Target, a key component of Adobe Experience Cloud, allows ERP systems to deliver personalized content dynamically. This blog explores the integration of Adobe Target with AEM, detailing the step-by-step process to optimize ERP development with intelligent content delivery.
At the end of this blog, you will be able to integrate Adobe Target with AEM and export an Experience Fragment to Adobe Target. It later aims to do personalization targeting using experience fragments; however, that will be covered in later blogs. Further, Adobe launch configuration is done to load tag libraries to our project site based on rules on how our site responds to the visitor’s interaction.
Prerequisites:
1. Up and running local AEM Cloud SDK.
2. Have approver-level access to Adobe Target console to create audiences and activities.
3. Have access to create Property under Tags in the Data Collection console.
4. Have Editor access to the Project created in Adobe Developer Console.
5. Admin console access to provide access to the project.
Integration Steps:
1. Create IMS configuration for Target in AEM
2. Project creation in Adobe Developer Console
3. Configure IMS configuration for Target in AEM
4. Legacy Cloud services for Target
5. Update cloud services configuration in the Root folder under which the Experience Fragment resides
6. IMS configuration for Launch
7. Create a Property under Tags in the Data Collection Console and rules to load the script
8. Adobe Launch configurations
9. Provide the cloud configuration in the Project site’s root folder properties
Steps for Integration
1. Setting Up IMS Configuration for Adobe Target in AEM
Head towards your AEM instance and follow the below steps:
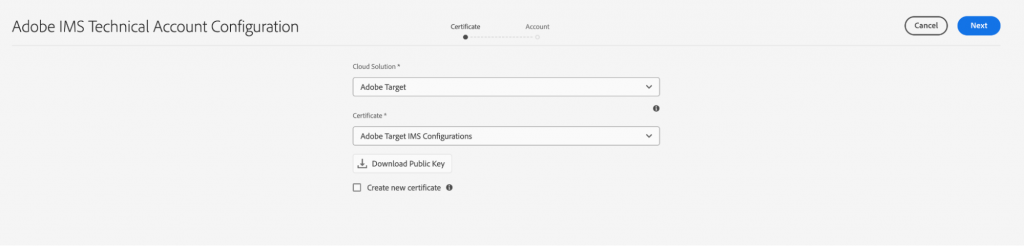
Navigate to Tools > Security and then Adobe IMS Configurations. Click on Create and select “Adobe Target” as Cloud Solution. Select the checkbox to create a new certificate by providing some alias to it. Click on Create Certificate and download the generated public key (which will be added to the project created in the next step).
2. Creating a Project in Adobe Developer Console
We’ll now start creating a project in Adobe Developer Console by following the below steps:
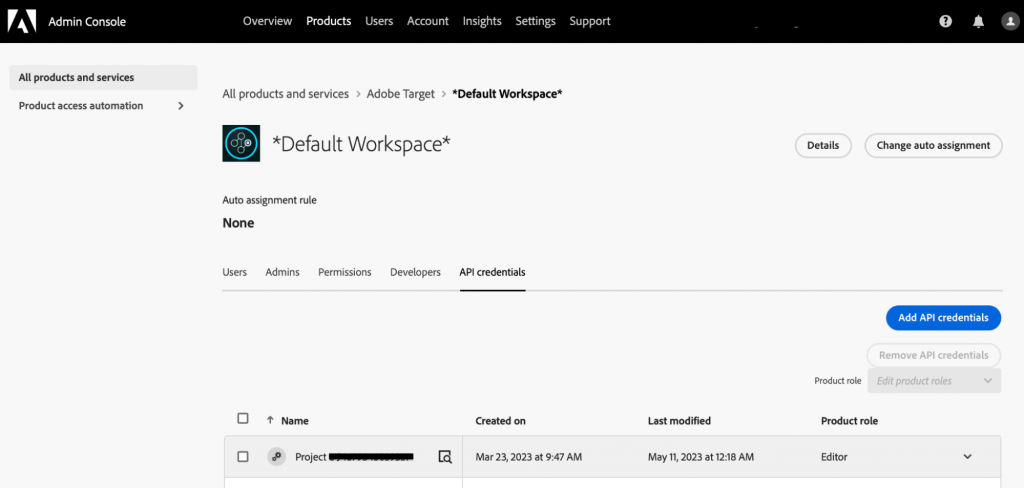
Create a new empty project on the developer console. Click on Add to Projects to add the “Adobe Target” API. In the authentication method, select “Service Account (JWT).” Upload the public key generated in the previous step. Click Next and select the relevant Product Profiles. Similarly, add “I/O Events” API and “Experience Platform Launch API.” Now go to Adobe Admin console and navigate to Products > Adobe Target > Product Profile. Under the “API Credentials” tab, provide Editor access to the created project.
We will now be using this project’s credentials to configure an IMS configuration for Adobe Target in AEM created in the previous step.
3. Configuring IMS for Adobe Target in AEM
– Use the project credentials to configure IMS settings in AEM.
– Provide the Client ID, Client Secret, and JWT Payload in the appropriate fields.
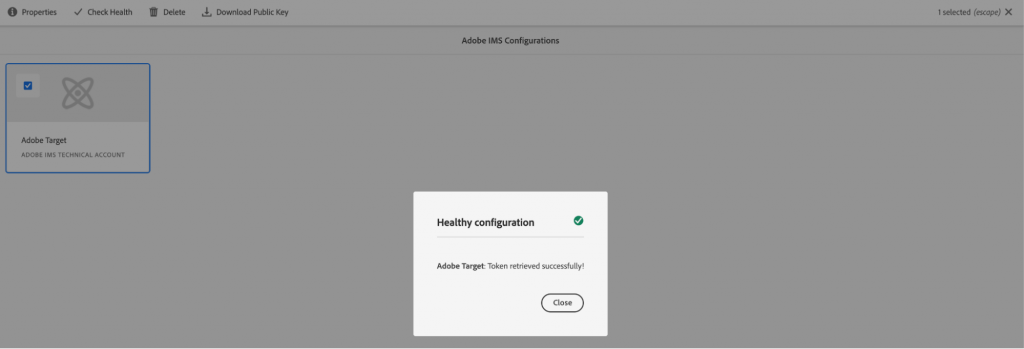
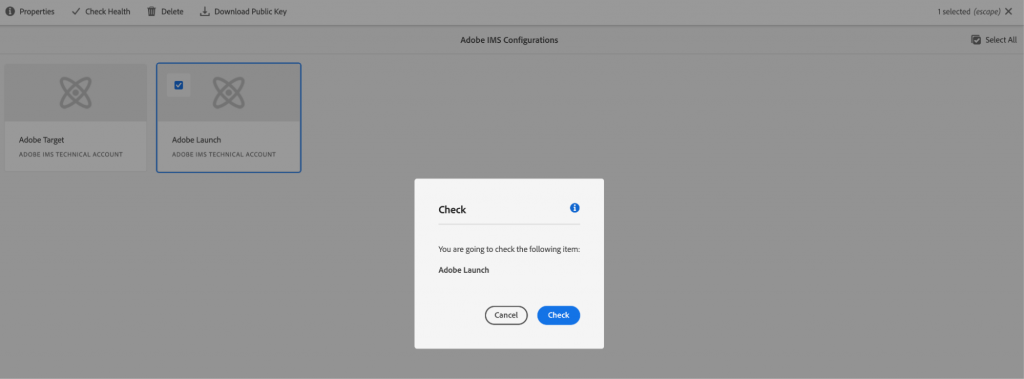
– Click Check Health to verify the token retrieval.
4. Setting Up Legacy Cloud Services for Adobe Target
In AEM, go to Tools > Cloud Services > Legacy Cloud Services. Scroll down to Adobe Target > Configure Now and provide a relevant title. Choose Authentication as IMS, Client code as Client ID from the JWT tab, Tenant ID as Organization code (can be picked from Adobe Experience Cloud Console URL), IMS Configuration as the one created in the previous step, API Type as REST, Client Library as AT.js. Check the connection by clicking on Connect to Adobe Target and it should pop up with the message “Connection successful.” Now, you have completed the Target connection with AEM and are ready to create and export Experience Fragments in the next steps.

5. Configuring Experience Fragments for Adobe Target
– Navigate to Experience Fragments in AEM.
– Select the root folder containing the Experience Fragment variations.
– Under Cloud Services Configuration, assign the Adobe Target setup from the previous step.
– Choose the Adobe Target Export Format (HTML/JSON/both) and workspace.
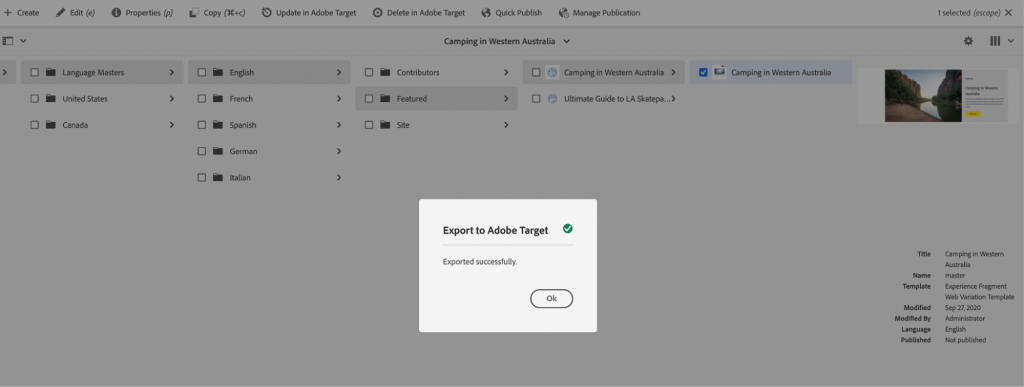
– After saving, select an Experience Fragment and click Export to Adobe Target.
– Verify the exported fragment in the Offers tab of the Adobe Target console.
6. IMS configuration for Launch:
Follow the IMS configuration process but select Adobe Launch this time.
7. Creating a Property and Rules in Data Collection Console
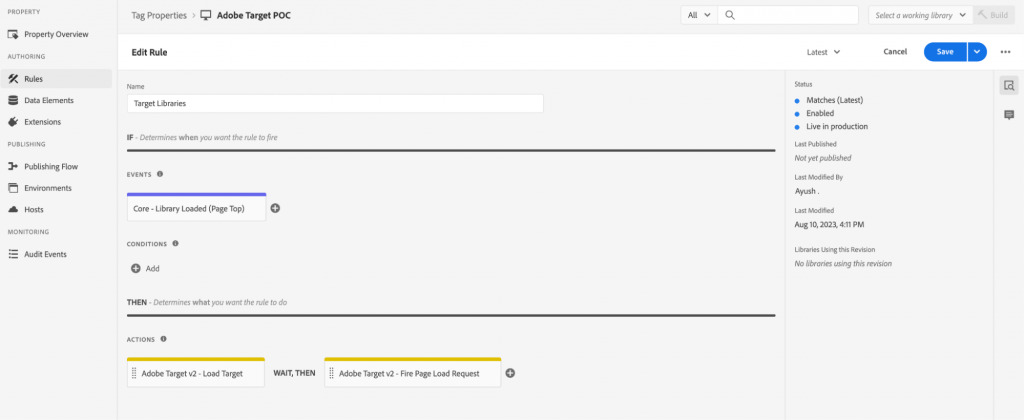
Navigate to Data Collection Console on AEC > Tags. Click on New Property. Provide a name to the property, and in the Domain, provide a valid domain name (for local AEM, put it as localhost.com). Save the property. Navigate to the Extensions tab and install the “Adobe Target V2” extension from the catalog. To add rules for loading delivery calls from AEM to Target, navigate to the created property. Click on Add Rule. Provide a name. In the Events, add an Event Configuration by providing Extension as “Core”, and Event Type as “Library Loaded (Page Top)”. In the Actions, add an Action Configuration by providing an Extension as “Adobe Target V2” and an Event Type as “Load Target.” Similarly, add one more action, “Adobe Target v2 – Fire Page Load Request.” Save all the changes.
8. Configuring Adobe Launch in AEM
– Go to Tools > Cloud Services > Adobe Launch Configurations in AEM.
– Select the IMS configuration for Launch created earlier.
– Enable Load Library Asynchronously for staging and production.
– Copy the generated script from Adobe Data Collection Console and embed it in the AEM project’s head tag.
9. Assigning Cloud Configuration to the AEM Project
– In the AEM Sites Console, navigate to the Project’s Root Folder.
– Open Properties > Advanced Tab and select the folder containing the Adobe Launch configuration.
– Save the changes to apply the cloud integration.
Conclusion
Integrating Adobe Target with AEM enhances ERP development by providing dynamic, data-driven personalization. This guide has outlined the necessary steps, from IMS configuration to Adobe Launch setup. By leveraging Adobe Analytics Data Layer, businesses can further optimize data collection and analysis, leading to improved decision-making and enhanced digital experiences. Stay tuned for upcoming blogs where we will explore activity types and audience segmentation in Adobe Target.
Do you like to read more educational content? Read our blogs at Cloudastra Technologies or contact us for business enquiry at Cloudastra Contact Us.