JavaScript Testing with Puppeteer and Jest Tools

Introduction
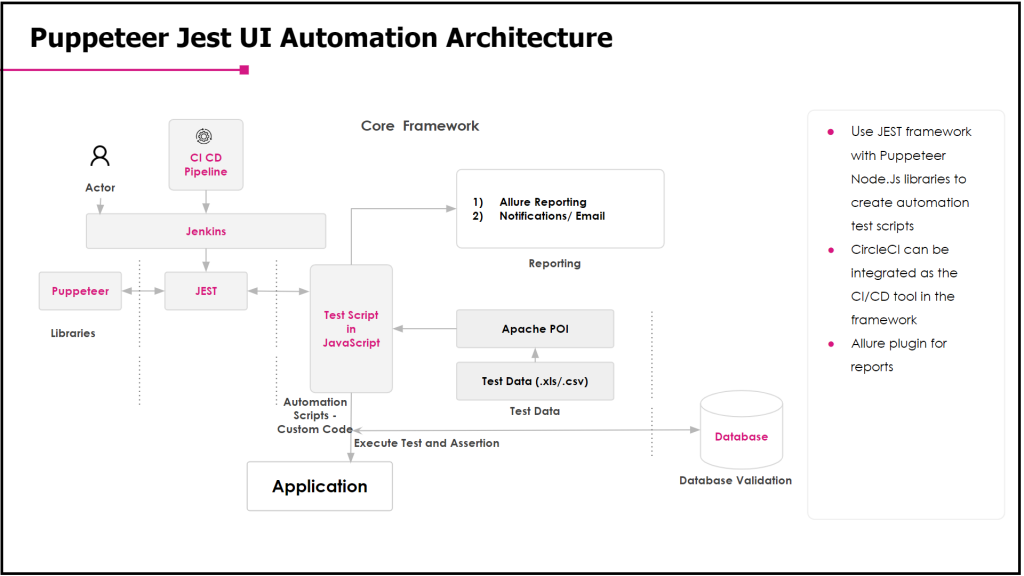
JavaScript testing has become an essential aspect of software development, ensuring that applications function correctly before they reach users. Automated testing allows developers to detect issues early, streamline debugging, and enhance application stability. This blog explores how to perform automated software testing using Puppeteer and Jest, two powerful tools that simplify the testing process.
What is Puppeteer?
Puppeteer is a Node.js library developed by Google that allows you to control headless Chrome through the DevTools Protocol. It is a valuable tool for JavaScript testing, enabling automation in web applications without requiring browser extensions like Selenium WebDriver or PhantomJS.
Puppeteer Features
– Provides a high-level API for browser automation.
– Runs tests in a headless environment by default for efficiency.
– Captures screenshots and generates PDFs.
– Allows automated UI testing for web applications.
What is Jest?
Jest is a delightful JavaScript testing framework that focuses on simplicity and reliability. It supports various technologies, including Babel, TypeScript, Node.js, React, Angular, and Vue, making it a versatile choice for frontend and backend testing.
Puppeteer Features
Prerequisites
To utilize Puppeteer and Jest effectively, you should have a basic understanding of Node.js and Puppeteer, along with a suitable IDE such as VS Code.
Puppeteer Setup and Libraries Installation
Once you’ve ensured that your development environment is ready, the next step is to install Jest and Puppeteer. After the installation, create a `jest.config.js` file at the project’s root and make the following changes:
1. Set `bail: 5`.
2. Set `preset: “jest-puppeteer”`.
Create Two Files at the Root
Create the following files in your project:
1. `babel.config.js`
2. `jest-puppeteer.config.js`
Test Cases Implementation
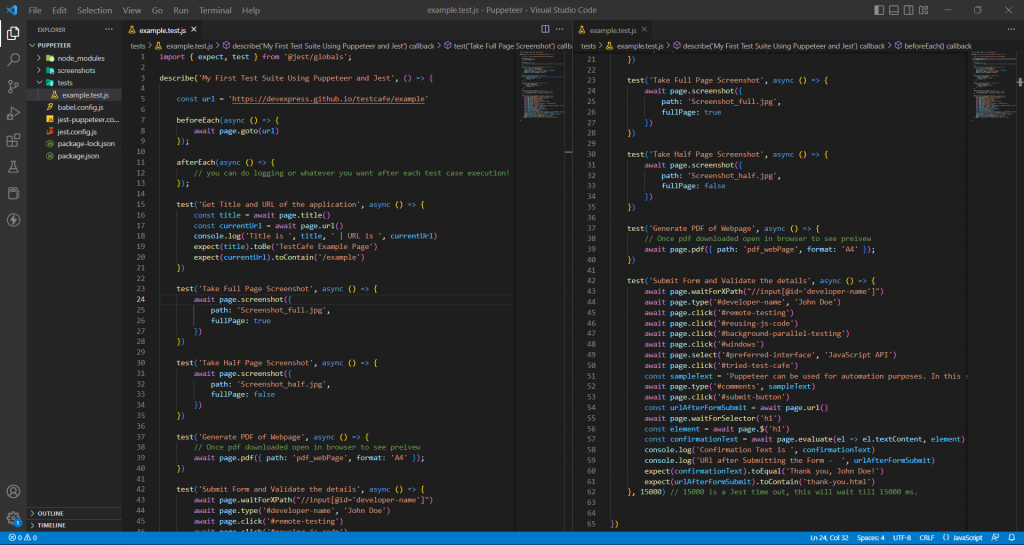
Now that the installation and configuration are complete, you can automate your test cases. Create a folder named `tests` at the root of your project. Inside this folder, create a file named `example.test.js` for writing your test cases.
Execution and Explanation
To run the test cases you’ve written, you need to create a script in the `package.json` file. Update the script section as follows:
“`json
“scripts”: {
“test”: “jest”
}
“`
Once the script has been added, open your terminal and type `npm run test` to execute your tests.
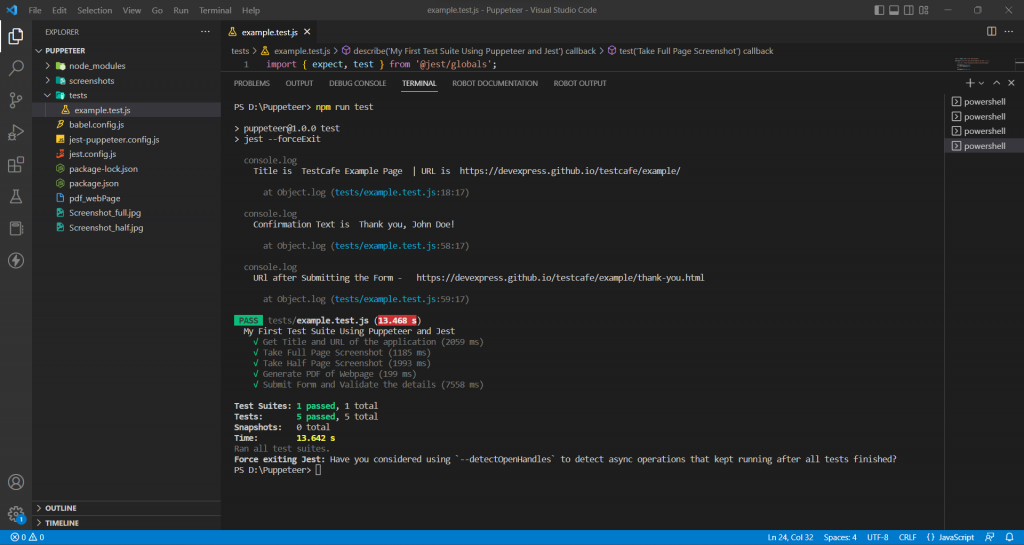
Test Result
Once the test runs, the output will indicate whether each test passed or failed, along with additional debugging information.
Source Code Link
You can access the source code for the project [here](https://drive.google.com/drive/folders/1wsul8BX71JmG6xSJo493YM12gnOI9UJf?usp=share_link).
Conclusion
JavaScript testing plays a crucial role in ensuring application reliability. Puppeteer and Jest provide an efficient and scalable solution for automated testing in software development. Their ability to automate UI interactions, validate web pages, and streamline debugging makes them essential tools for developers. By integrating these testing frameworks into your workflow, you can enhance code quality and deliver stable applications.
If you have any questions or feedback, feel free to leave a comment. Happy testing!
Do you like to read more educational content? Read our blogs at Cloudastra Technologies or contact us for business enquiry at Cloudastra Contact Us.