
Introduction
Agent onboarding plays a crucial role in the success of modern contact centers. A seamless and secure onboarding process ensures that new agents can quickly access the tools they need to perform efficiently. With frequent staffing changes driven by business demands, seasonal hiring, and specialized skill requirements, organizations must adopt automated solutions to manage provisioning effectively.
By automating agent onboarding, organizations can eliminate manual errors, enhance security, and accelerate user access provisioning. Automated systems enforce role-based access controls, immediately revoke permissions for departing agents, and ensure compliance with data protection regulations. Additionally, real-time monitoring and audit trails provide greater visibility into access changes, reducing the risk of security breaches.
In this post, we’ll explore how to streamline agent onboarding by integrating Okta Event Hooks with Amazon Connect. This integration automates the provisioning process, ensuring that new agents are added to Amazon Connect as soon as they are created in Okta. This not only reduces errors but also improves efficiency and compliance.
Overview of the Solution

1. An agent is added to the Amazon Connect agent group in Okta.
2. Adding the agent to the Amazon Connect agents group in Okta triggers an Event Hook, which automatically sends the agent’s details to Amazon API Gateway.
3. Amazon API Gateway triggers the AWS Lambda function to handle and process the request.
4. The Lambda function uses the agent details to create the agent in Amazon Connect using CreateUser API.
Prerequisites
For this walkthrough, you should have the following prerequisites:
1. An AWS account
2. An Okta account
3. An Amazon Connect Instance
4. Configured single sign-on (SSO) integration between Amazon Connect and Okta
In addition, you should have basic knowledge and understanding of the following services and features:
1. AWS Lambda
2. Amazon API Gateway
3. Basic understanding of Amazon Connect
4. Basic knowledge of Amazon Connect APIs and AWS Cloud Development Kit v2
5. Basic knowledge of Okta
6. Basic knowledge of Git
Deployment Steps
1. Install Git.
2. Install NodeJS (Long Term Support version v18.20.4 or higher).
3. Install AWS CDK by running npm install -g aws-cdk.
2. Deploy Okta Webhook API
For deploying the solution, execute the following steps in the same region where your Amazon Connect instance is deployed. Before you begin, make sure you have the following IDs on hand: Amazon Connect Instance ID, Security Profile ID, and Routing Profile ID.
1. Instance ID – Find your Amazon Connect instance ID.
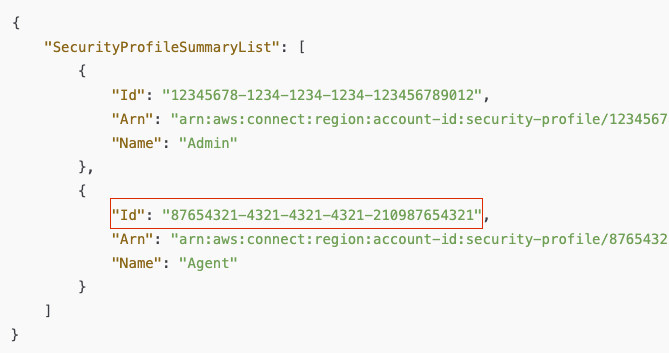
2. Security Profile ID – You can retrieve the Security Profile ID using the CLI by running `aws connect list-security-profiles –instance-id ` command. Replace with your Amazon Connect Instance ID. The output will include Security Profile ID and Name of each profile. Select the Security Profile ID you would like to auto assign to your agents.
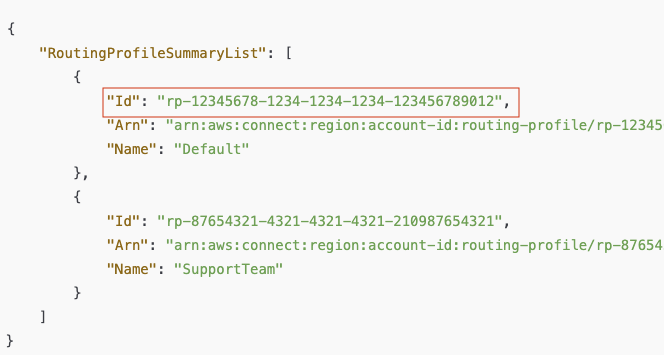
3. Routing Profile ID – You can retrieve the Routing Profile ID using the CLI by running `aws connect list-routing-profiles –instance-id ` command. Replace with your Amazon Connect Instance ID. The output will include Routing Profile ID and Name of each profile. Select the Routing Profile ID you would like to auto assign to your agents.
4. Using Git, clone the repository from GitHub `git clone https://github.com/aws-samples/amazon-connect-user-provision-with-okta.git`.
5. In your terminal, move into the root directory `cd amazon-connect-user-provision-with-okta`.
6. Set the environment variables with your AWS credentials.
7. Run the following commands to start CDK deployment:
– `chmod a+x bootstrap.sh start.sh cleanup.sh`
– `./bootstrap.sh`
– `./start.sh`
8. Enter connect-security-profile-id, connect-routing-profile-id, and connect-instance-id and confirm that parameters are correct. Press Y to confirm.
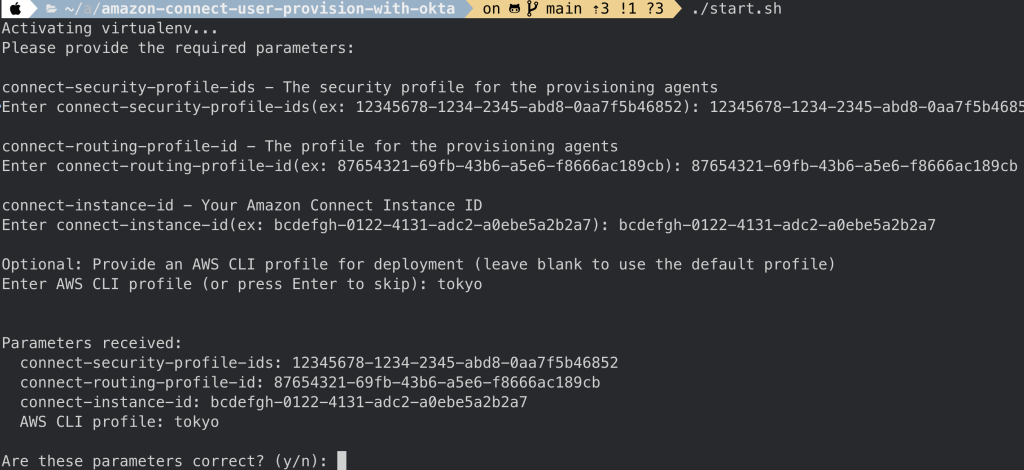
9. Copy the OktaConnectorStack.ApiUrl value from the final output after the execution completes; you will need this URL for later use. This URL will act as the endpoint for your Okta event hook.

Configure Okta Group and Application Assignment
1. Sign in to the Okta Admin Console – Access your Okta Admin Console dashboard using your admin credentials.
2. Navigate to the Groups Menu. Go to the Directory section and Click on the Groups menu.
3. Create a New Group. Click the Add Group button, in the form that appears: Enter a Name: Amazon Connect Agents. Optionally, add a Description: This group contains Amazon Connect agents.

You can extend this solution to configure multiple groups tailored to your business needs. These groups could represent job roles (such as agents, supervisors, and admins) or different lines of business.
4. Click Save to create the group.
5. Navigate to Groups and click on the newly created Amazon Connect Agents group.
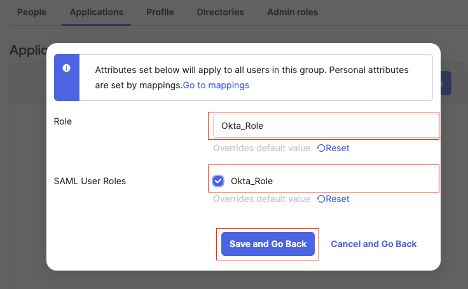
6. Assign the Amazon Connect Application. Click the Assign Applications button, from the list of available applications, select Amazon Connect.
7. During assignment, select the Okta_Role option. Click Save and Go Back to complete the process.
Configure Okta Webhook
1. Navigate to the Setting Menu. Go to the Features Menu and enable Event Hook Filtering.

2. Navigate to the Workflow Menu. Go to the Event Hooks section and Click Create Event Hook.
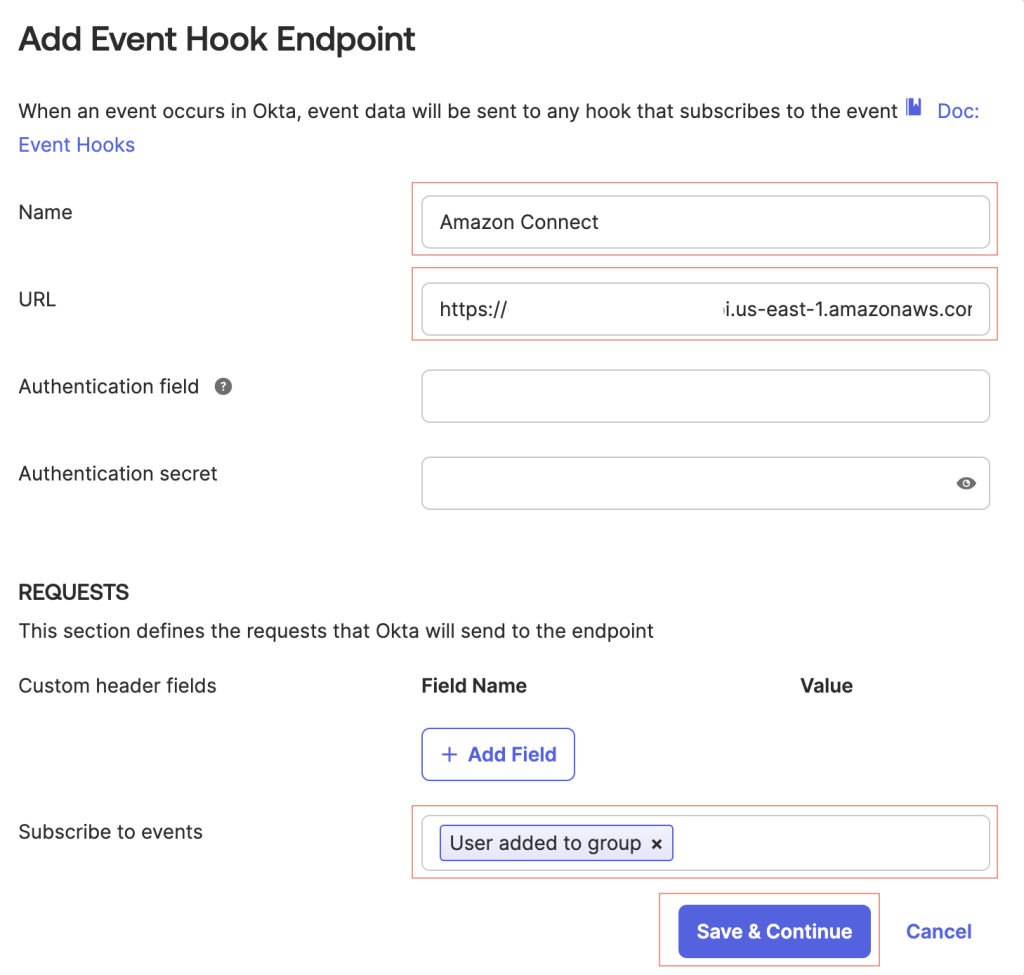
3. Complete required fields:
– Endpoint URL: Enter the endpoint URL (OktaConnectorStack.ApiUrl output that was provided during CDK deployment).
– Event Hook name: Enter a unique name for the event hook.
– Description: Enter the purpose and a description of the event hook.
– Subscribe Events: Select User added to group option from the dropdown menu.
– Click Save & Continue.
4. For our use case, we only want to process events exclusively when an agent is added to the Amazon Connect Agents group, which we configured in the previous steps. In the filters tab, select the Apply Filter option, then click on the Use Okta Expression Language (Advanced) link.
5. Paste the following expression language into the provided field: `event.target.?[type eq ‘UserGroup’ && displayName eq ‘Amazon Connect Agents’].size()> 0`.
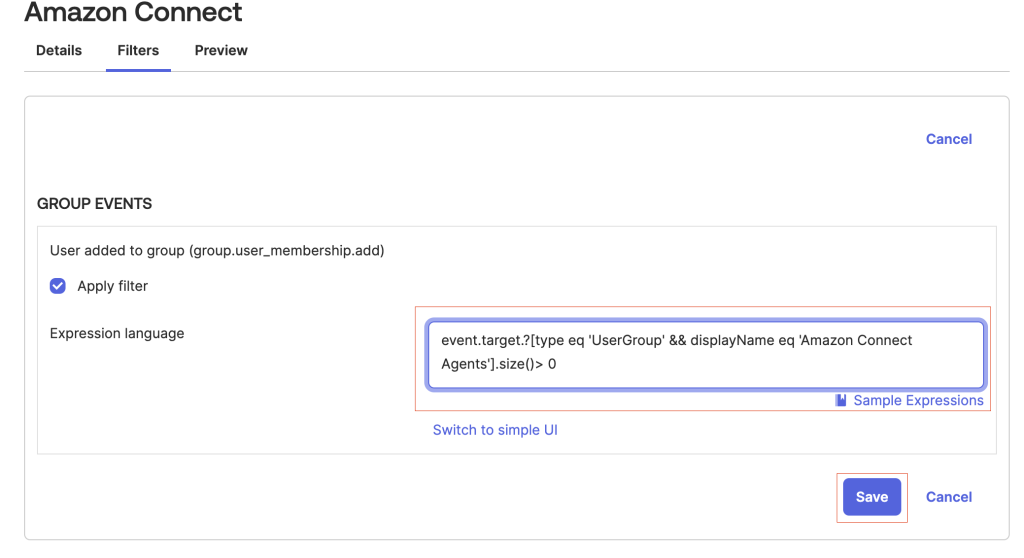
6. Click Save.
7. To activate the hook, verify endpoint ownership by clicking the Verify button. You should receive a successful verification message.
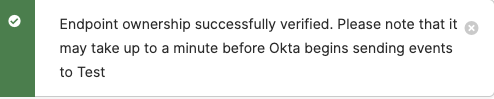
Before sending an event request to your endpoint, Okta performs a one-time GET verification request. During this process, Okta provides a verification value that your service must return, confirming your ownership and control of the endpoint.
Test the Solution
1. Sign in to the Okta Admin Console – Access your Okta Admin Console dashboard using your admin credentials.
2. Navigate to the People Menu. Go to the Directory section and Click on the People menu.
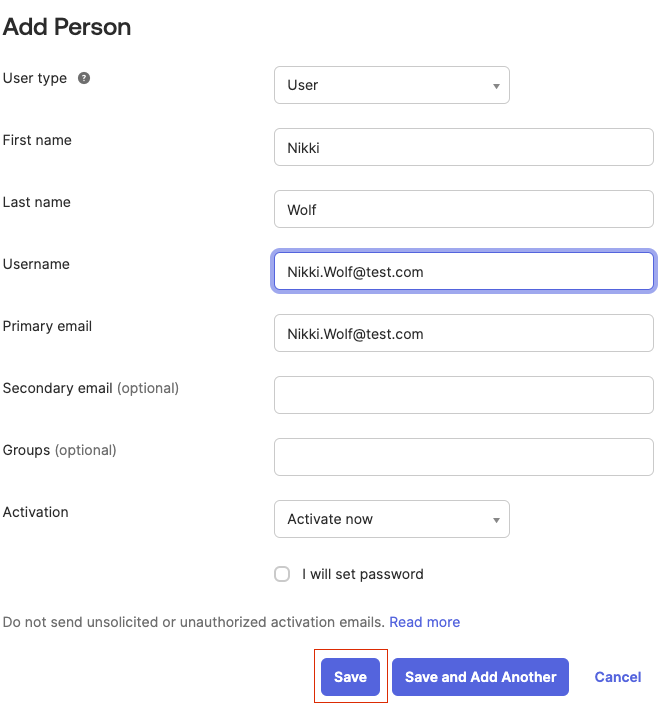
3. Click the Add Person button, complete the Add Person form, and then click Save.
4. Navigate to the Groups Menu. Go to the Directory section and click on the Groups menu.
5. Select Amazon Connect Agents group and click on the Assign people button. Select the agent you just created by clicking on the + sign.

6. Sign in to your Amazon Connect instance.
7. In the left-hand navigation pane, go to Users and select User Management. You should now see that the agent created in Okta has been automatically provisioned in Amazon Connect.

Cleaning Up
To avoid incurring future charges, delete the resources using the following steps:
1. In your terminal, move into the root directory `cd amazon-connect-user-provision-with-okta`.
2. Run `./cleanup.sh` command.
3. Optionally, remove Web Hook from Okta.
Conclusion
Automating agent onboarding with Okta and Amazon Connect streamlines contact center operations, reducing manual provisioning efforts by up to 95%. This solution enhances efficiency, minimizes human errors, and strengthens security by enforcing automated role-based access controls.
With API-driven automation, new agents are granted permissions instantly, ensuring seamless onboarding. Integrating Okta with Amazon Connect empowers organizations to implement use cases with API portal packages, further enhancing scalability and operational agility.
Cloudastra Technologies helps businesses optimize cloud solutions with automation-driven provisioning. Contact us to explore tailored integrations that enhance your cloud infrastructure.
Do you like to read more educational content? Read our blogs at Cloudastra Technologies or contact us for business enquiry at Cloudastra Contact Us.